

Shadows of Time
PSP's adjustment layer can be used to create the image of an object's shadow. Through a series of shadow images at stepped angles, the artist can create an animation suggesting the passgae of time.
Open a new 200 by 200 white canvas.
- Preset Shapes
- Choose a shape with a flat bottom.
- Center the shape.
- Layers —> Convert to Raster Layer
- Save the image and open a copy.
- Select the shape: Magic Wand —> Click on white background —>. Then Selections —> Invert
- Layers —> New Adjustment Layer —> Brightness/Contrast...
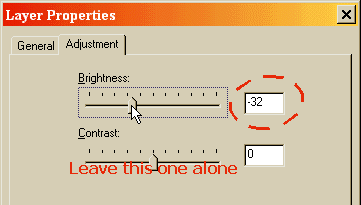
- Use the slider to achieve a negative value in the Brightness box. I used -32. The higher the number, the darker the shadow. Click OK.
- Layers Palette —> Brightness/Contrast
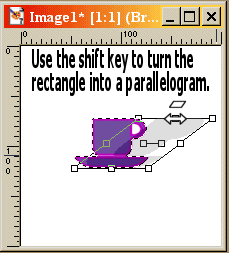
- Choose the Deformation tool. Use only the top center deformation node. Hover near the top center node. When you see the two-headed arrow and the rectangle, press the shift key on your keyboard. The rectangle becomes a parallelogram. This allows you to maintain complimentary angles at the top left and right corners as you drag the top of the shadow.
- Drag the node out toward the right edge of the canvas. You should see a shadow.
- Release the shift key and use the center node to adjust the shadow's height.
- Apply the deformation.
- Layer Palette. Drag Layer1 to the top of the roster to place it in front of its shadow.

- Save as a gif. Use a numerical scheme to make setting up your animation easier. For example: apple1.gif, apple2.gif, etc.
Now, you have an object and its shadow. Create a series of shadow images repeating
steps 6 through 15 for each position of the shadow.
If you use a symmetrical object, you can use Image —> Mirror to move the shadow to the left side of the object. Be sure that the Brightness/Contrast layer is selected.
Animation Shop
Use the Animation Wizard to set up your shadow movement animation:
-
Choose Same size as first image. Next.
- Choose Opaque. Next.
- Choose Centered in the frame and With canvas color. Next.
- Choose Yes repeat indefinitely. Set the time at 40. Next.
- Add images. Use the Move Up and Move Down buttons to put the frames in order. Next.
- View —> Animation
- Adjust frame order and timing as needed.
- If your shadow is going counterclockwise: Edit —> Select All. Then Animation —> Reverse Frames.


